Rust 版 ServerStatus 探针安装步骤
编辑
背景
之前用的探针nezha升级到v1了,刚好想着换一个其他的看看。
看了一圈,选中了ServerStatus-Rust。
先停掉nezha
dashboard和agent 都在下面,自选
#自带的卸载先来一遍
./nezha.sh stop_dashboard
./nezha.sh uninstall_dashboard
./nezha.sh uninstall_agent

# 停止哪吒服務
systemctl stop nezha-agent
systemctl stop nezha-dashboard

# 禁用服務
systemctl disable nezha-agent
systemctl disable nezha-dashboard

# 刪除服務檔案
rm -f /etc/systemd/system/nezha-agent.service
rm -f /etc/systemd/system/nezha-dashboard.service

# 刪除程式文件
rm -rf /opt/nezha
rm -rf /etc/nezha

# 刪除日誌文件
rm -rf /var/log/nezha

# 重新載入 systemd
systemctl daemon-reload

echo "哪吒面板已完全移除"
基础条件
面板准备搭建在centos上 适用系统:centos,其他发行版按流程稍改命令一般也可。
- 一个域名解析到作为服务端机子的ip上,比如 yuming.com。既可用于web端界面访问,也可用于客户端联系服务端。
之前的nezha我使用了两个域名,这个rust探针只需要1个,不错哦。
- VPS 的网络可以访问GitHub
开始安装 ServerStatus-Rust
确保安装了一些软件工具
yum install -y curl unzip
1. ServerStatus 服务端
先开启防火墙
#sudo systemctl start firewalld
#sudo systemctl enable firewalld
systemctl status firewalld # 查看防火墙状态
sudo firewall-cmd --list-ports # 查看是否已开启了8080和9394 #如果冲突可以修改为38080 39394
sudo firewall-cmd --zone=public --add-port=8080/tcp --permanent
sudo firewall-cmd --zone=public --add-port=9394/tcp --permanent
sudo firewall-cmd --reload
sudo firewall-cmd --list-ports# 检查是否开启了8080和9394
2. 配置服务端
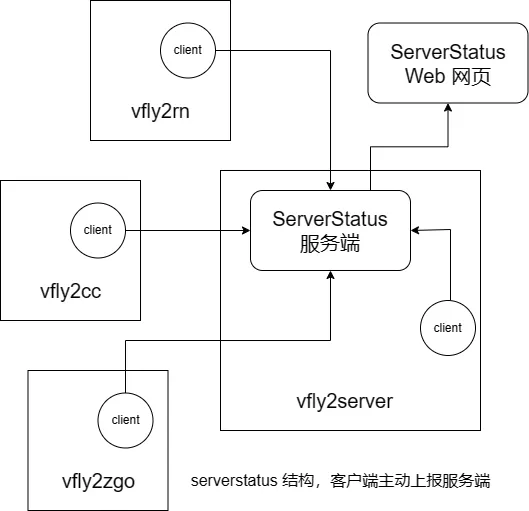
作为服务端的机器,除了要安装 ServerStatus-Rust 的服务端,还需要安装客户端。
serverstatus 结构,客户端主动上报服务端:

adduser masker # 创建一个用户后期运行systemd
passwd masker # 设置密码
usermod -aG wheel masker # 将masker添加到sudoer 方便后续执行sudo

su masker #切换为masker配置
获取机器架构,查找最新版本
# get_architecture
arch=$(uname -m)
# 设置 ARCHITECTURE 变量
if [[ $arch == "aarch64" ]]; then
    ARCHITECTURE="aarch64"
elif [[ $arch == "x86_64" ]]; then
    ARCHITECTURE="x86_64"
else
    ARCHITECTURE="unknown"
fi

github_project="zdz/ServerStatus-Rust"
tag=$(curl -m 10 -sL "https://api.github.com/repos/$github_project/releases/latest" | grep "tag_name" | head -n 1 | awk -F ":" '{print $2}' | sed 's/\"//g;s/,//g;s/ //g')
echo ${tag}
# 返回 v1.8.1
这个变量tag后续也会用到。
创建安装目录(比如用家目录下的 myserve/serverstatus)
mkdir -p ~/myserve/serverstatus && cd ~/myserve/serverstatus
下载和解压服务端
curl -L -O https://github.com/zdz/ServerStatus-Rust/releases/download/${tag}/server-${ARCHITECTURE}-unknown-linux-musl.zip && \
unzip -o "server-${ARCHITECTURE}-unknown-linux-musl.zip" && \
rm "server-${ARCHITECTURE}-unknown-linux-musl.zip" -f
下载和解压客户端
curl -L -O https://github.com/zdz/ServerStatus-Rust/releases/download/${tag}/client-${ARCHITECTURE}-unknown-linux-musl.zip && \
unzip -o "client-${ARCHITECTURE}-unknown-linux-musl.zip" && \
rm "client-${ARCHITECTURE}-unknown-linux-musl.zip" -f
进入工作目录,编辑服务端的配置文件
cd ~/myserve/serverstatus
rm -f config.toml #删除默认的
sudo vi config.toml
输入以下内容
# 默认安装的路径
workspace = "/home/masker/myserve/serverstatus"

# 侦听地址, ipv6 使用 [::]:9394 #可以自定义
grpc_addr = "0.0.0.0:9394"
http_addr = "0.0.0.0:8080"
# 默认30s无上报判定下线
offline_threshold = 30

# 管理员账号,不设置的话,默认随机生成,用于查看 /detail, /map,自行修改
admin_user = "admin_user"
admin_pass = "112233"

hosts = [
  {name = "vfly2bwg", password = "123456", alias = "Bwg", location = "US", type = "KVM", labels = "os=debian;ndd=2024/1/15;spec=2C/2G/40G;"},
  {name = "vfly2ht", password = "123456", alias = "HT", location = "TR", type = "VMware", labels = "os=debian;ndd=2024/3/28;spec=1C/1G/20G;"},
  {name = "vfly2as", password = "123456", alias = "alongserver", location = "AS", type = "arm", labels = "os=arch;ndd=2029/11/25;spec=4C/2G/14G;", notify = false},
]

# 告警间隔默认为30s
notify_interval = 30

[tgbot]
# 开关 true 已打开 不需要则改为false
enabled = true
bot_token = "<tg bot token>"
chat_id = "<chat id>"

title = "❗<b>Server Status</b>"
online_tpl =  "{{config.title}} \n😆 {{host.location}} {{host.alias}} 主机恢复上线啦"
offline_tpl = "{{config.title}} \n😱 {{host.location}} {{host.alias}} 主机已经掉线啦"
custom_tpl = """"""
保存退出。
其中必须要自定义的的变量: workspace、admin_user 和 admin_pass、hosts,其他可以不管,不影响基本使用。
详细说明参考https://doc.ssr.rs/server/#1-configtoml
测试配置文件是否有效
./stat_server -c config.toml -t
返回如下则成功
✨ the conf file config.toml syntax is ok
✨ the conf file config.toml test is successful
根据配置发送测试消息,验证通知是否生效
./stat_server -c config.toml --notify-test
返回如下则成功
✨ run in normal mode, load conf from local file `config.toml
✨ admin_user: admin_user
✨ admin_pass: 112233
Please check for notifications
服务端运行
./stat_server -c config.toml
这时,如果没有出错,访问 IP:8080 即可看到 Web 网页。我们也可以配置反向代理如下,去掉端口尾巴
3. 配置反向代理
在宝塔面板中新建一个站点,域名填写公开访问域名,如 “yuming.com“ ,然后点击“设置”进入站点设置选项,选择“反向代理” - “新建反向代理”
自定义一个代理名称,在下方“目标 URL”中填入 http://127.0.0.1 然后点击“保存”
打开刚刚新建的反向代理右边的“配置文件”,将配置文件替换为以下内容:
#PROXY-START/
location / {
    proxy_pass http://127.0.0.1:8080;
    proxy_set_header Host $http_host;
    proxy_set_header      Upgrade $http_upgrade;
}
location ~ ^/(ws|terminal/.+)$  {
    proxy_pass http://127.0.0.1:8080;
    proxy_http_version 1.1;
    proxy_set_header Upgrade $http_upgrade;
    proxy_set_header Connection "Upgrade";
    proxy_set_header Host $http_host;
}
#PROXY-END/
点击“保存”现在,你应该可以直接使用域名,如:“yuming.com“ 来访问面板了。
和IP:8080页面是一样的
不过,很明显,现在如果断开 SSH 连接,服务端也就不运行了,使用 systemd 守护进程解决这个问题,具体内容请往下看。
若想查看地图,访问 yuming.com/map
刚才测试的是站点开启过程,退出ssh就会消失。
下面我们让探针一直后台运行
让服务一直运行
1. 服务端
sudo vi /etc/systemd/system/stat_server.service
注意修改 User、Group、WorkingDirectory、ExecStart
插入以下内容
[Unit]
Description=ServerStatus-Rust Server
After=network.target

[Service]
User=masker
Group=masker
Environment="RUST_BACKTRACE=1"
WorkingDirectory=/home/masker/myserve/serverstatus
ExecStart=/home/masker/myserve/serverstatus/stat_server -c /home/masker/myserve/serverstatus/config.toml
ExecReload=/bin/kill -HUP \$MAINPID
Restart=on-failure

[Install]
WantedBy=multi-user.target
加载配置
sudo systemctl daemon-reload
开机自启,立即启动
sudo systemctl enable --now stat_server
# 其余命令,有需要自取
sudo systemctl stop stat_server
sudo systemctl start stat_server
sudo systemctl restart stat_server
sudo systemctl status stat_server
2. 客户端
客户端就1个接1个配置了。
添加新的一个服务器都一个流程:
添加普通用户masker、下载client文件、再配置Systemd 守护进程
sudo vi /etc/systemd/system/stat_client.service
注意修改 User、Group、WorkingDirectory、ExecStart
插入以下内容
其中ExecStart -u和-p则是服务端的配置文件中写的,所以name(不能重复),它对应u,password对应p
[Unit]
Description=ServerStatus-Rust Client
After=network.target

[Service]
User=masker
Group=masker
Environment="RUST_BACKTRACE=1"
WorkingDirectory=/home/masker/myserve/serverstatus
ExecStart=/home/masker/myserve/serverstatus/stat_client -a "https://yuming.com/report" -u vfly2bwg -p 123456
ExecReload=/bin/kill -HUP \$MAINPID
Restart=on-failure

[Install]
WantedBy=multi-user.target
加载配置
sudo systemctl daemon-reload
开机自启,立即启动
sudo systemctl enable --now stat_client
# 其余命令,有需要自取
sudo systemctl stop stat_client
sudo systemctl start stat_client
sudo systemctl restart stat_client
sudo systemctl status stat_client
查看日志
journalctl -u stat_client -f -n 100
部署过程遇到的问题
1. 域名反代cf
部署没有问题,本来 stat_client.service写的是
ExecStart=/home/masker/myserve/serverstatus/stat_client -a "https://yuming.com/report"
访问域名一直转圈
sudo systemctl status stat_client也看不出来
网页打开开发者工具看到stats.json一直有刷新抓取,但是就是转圈。
突然想起来域名开启了cf的小黄云,之前就有http跳https的循环报错,具体原理忘记是啥了。
修改为
ExecStart=/home/masker/myserve/serverstatus/stat_client -a "https://yuming.com/report"
更新配置文件,重启client
sudo systemctl daemon-reload
sudo systemctl restart stat_client
发现网页正常了。

开始1个接1个配置其他小鸡客户端了。
- 1
- 0
-
赞助
 支付宝
支付宝
 微信
微信
-
分享
